
Resistance Band Setup: Inspect Band, Anchor, and Clearance
On this page
Quick answer
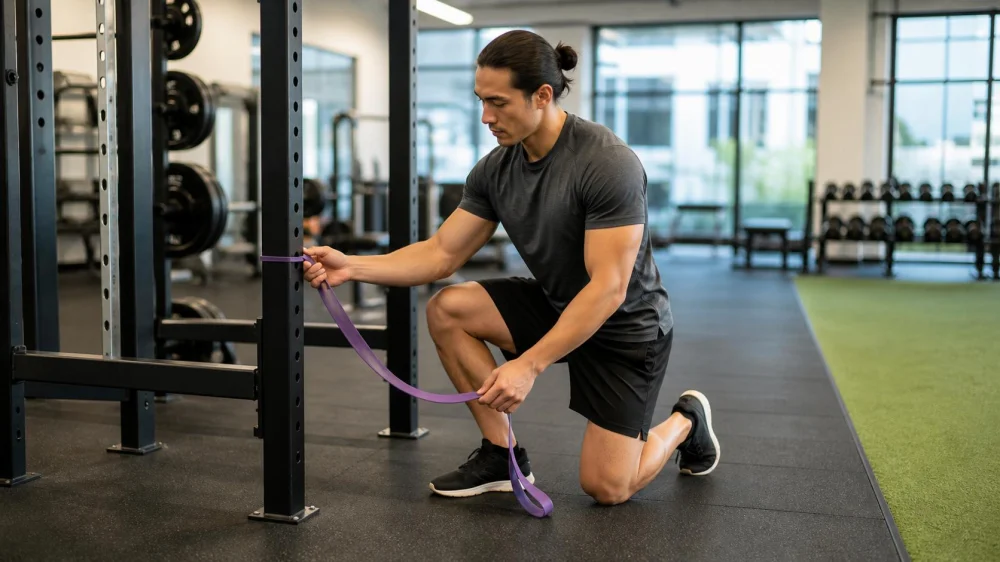
Before every resistance-band session, check the band, handles, clips, loops, and anchor for wear or damage. Confirm the anchor is designed, positioned, and secured for the intended pull. Clear people and breakable objects from the band's recoil path, keep it away from sharp or abrasive edges, and test the setup with light tension before beginning the exercise.

The Hot Yoga Spot / hot yoga saratoga springs
Saratoga SpringsSaratoga CountyNew York
75 Woodlawn Ave, Saratoga Springs, NY 12866, USA
Inspect the band
A resistance band can look usable at a distance while hiding damage near a handle, fold, or anchor point. Examine the entire unloaded length under good light. Look for cuts, cracks, tears, thinning, sticky or brittle areas, discolouration, exposed inner material, damaged stitching, loose plugs, bent clips, and distorted connectors.
Follow the manufacturer's inspection, cleaning, storage, life, and replacement instructions for that exact product. Colours do not represent one universal resistance level across brands. Do not knot, tape, glue, splice, or combine damaged equipment as an improvised repair.
Check shoes, jewellery, zippers, rough flooring, rack edges, and long fingernails that could abrade the material. Keep bands away from uncontrolled heat, sunlight, chemicals, and storage positions that create sharp folds if the manufacturer warns against them.

Planet Fitness / planet fitness mahopac new york
169 US-6, Mahopac, NY 10541, USA
Verify the anchor
Use an attachment point and connector intended for the equipment and direction of force. A rack, post, door, railing, furniture leg, or other object should not be assumed safe merely because it feels heavy. It can move, tip, open, cut the band, or release a fitting.
Ask gym staff before attaching a band to shared equipment. Inspect the rack and attachment area, avoid sharp corners and moving parts, and place the band where it cannot slide into a hazard. For a door system, follow its specific instructions and confirm the door, frame, hinge direction, anchor, and access control are suitable; keep others from opening it unexpectedly.
Clear the recoil path
Imagine the direct line from the anchor through the band and beyond the user. Move faces, eyes, other exercisers, mirrors, windows, screens, bottles, and loose equipment out of that line. Do not stand closer to the rebound path merely to film or coach.
Allow enough space for the full intended range without the band rubbing a surface or catching on a shoe, bench, rack, or clothing. Maintain secure footing on a stable, dry floor. Eye protection or other precautions may be appropriate for certain products or settings according to manufacturer or facility guidance.
Test before training
With the band slack, take the start position and confirm grip, connector orientation, and anchor height. Apply a small controlled tension while watching for movement, slipping, twisting, unexpected noise, or abrasion. Stop immediately if the anchor shifts or any component changes shape.
Use a resistance that allows controlled movement and alignment. Do not stretch beyond the product's stated limit or copy a setup without knowing its equipment and purpose. Release tension gradually; never let go of a stretched band to end a repetition.
Setup checklist
- Correct band and resistance identified.
- Full unloaded length inspected in bright light.
- Handles, clips, loops, and stitching checked.
- Approved anchor and pull direction confirmed.
- Sharp edges and moving parts avoided.
- Recoil line cleared of people and objects.
- Stable footing and full range available.
- Light-tension test completed.
- Controlled release planned.
Limitations and warning signs
This article is general equipment-safety information, not individual exercise or medical advice. Band materials, resistance, stretch limits, connectors, and anchors differ. Follow the product and facility instructions and ask qualified staff for setup help. Stop for pain, loss of control, equipment damage, eye contact, a fall, or other injury, and seek appropriate medical help when needed.
FAQ
Can I use tape over a small band tear?
No. Remove damaged equipment from use and follow the manufacturer's replacement guidance.
Is a heavy table a safe anchor?
Weight alone does not prove stability or edge safety. Use an approved setup and evaluate the direction of force.
Can I attach two bands together?
Only if the manufacturer permits the exact configuration and connectors. Improvised combinations can change load and recoil.
How often should bands be replaced?
Use the manufacturer's schedule and condition criteria. Environment, material, age, storage, and frequency of use differ.
Evidence notes
Hospital for Special Surgery provides resistance-band exercise guidance that demonstrates controlled alignment and deliberate anchoring. Its home exercise guidance also emphasises a stable surface. Product-specific inspection and anchor instructions still control.
Next steps
Before the next set, lay the unloaded band out fully, check every connector, identify the intended anchor and recoil line, then rehearse the movement under light tension. Replace questionable gear rather than trying to repair it.






 Stay Fit Studio5.0 (16 reviews)
 PRO 24 Gym4.0 (10 reviews)
 Noble Performance0.0 (0 reviews)
 Orangetheory Fitness5.0 (18 reviews)
 Perfect Fitness4.0 (55 reviews)
 Yoga Fitness Center4.0 (5 reviews)
 How to Do HIIT Safely and Effectively: Essential Tips for Maximum Results
 How to Improve Cardiovascular Fitness for Beginners: A Step-by-Step Guide
 The Best Glute-Focused Leg Day Routine: Sculpt Your Glutes with These Effective Exercises
 The Best Weekly Workout Schedule for Beginners
 How to Train Your Glutes for Strength and Shape: Complete Guide
 The Best Practices for Tracking Training Stress and Avoiding Burnout During Heavy Autumn Training